


Power Up Your Grow: A Step-by-Step Guide to Setting Up Your 600W Digital HPS Kit (Safely!)

Absolutely! Here's a blog post guiding users through setting up a 600W digital HPS kit, designed with SEO keywords and a human touch.
Power Up Your Grow: A Step-by-Step Guide to Setting Up Your 600W Digital HPS Kit (Safely!)
So, you're ready to take your indoor growing to the next level? Fantastic choice! A 600W Digital HPS (High-Pressure Sodium) grow light kit is a staple for many successful growers in Liverpool and across the United Kingdom, offering powerful, full-spectrum light that drives incredible plant growth, especially during the flowering stage.
But unboxing that kit can feel a bit daunting with all the wires and components. Don't worry! This guide will walk you through everything, from safe installation to understanding its power settings and optimal placement. Let's get your grow space glowing safely and effectively!
Why a 600W Digital HPS?
Before we dive in, let's quickly touch on why this specific kit is so popular. A 600W digital ballast offers flexibility that traditional magnetic ballasts don't. You can often dim it down for younger plants or cooler periods, and even "boost" it for maximum intensity during peak flowering – all while being more energy-efficient and running cooler.
What You'll Need:
-
Your 600W Digital HPS Kit (Ballast, Reflector, HPS Bulb)
-
A sturdy place to hang your light (grow tent frame, ceiling joists)
-
Light hangers/ratchets (Rope ratchets are highly recommended for easy adjustment)
-
A timer (digital timers offer more precision)
-
Your grow space (tent or room)
-
Gloves (especially when handling the bulb)
-
A screwdriver (if your reflector requires minor assembly)
-
Safety glasses (recommended during installation)
Step-by-Step Installation & Setup:
Step 1: Unpack and Inspect
Carefully remove all components from the packaging. Check for any damage to the ballast, reflector, or bulb. Ensure all cables are intact. This is also a good time to briefly familiarise yourself with the digital ballast's dimmer settings.
Step 2: Assemble the Reflector (If Needed)
Some reflectors come pre-assembled, others might require you to attach wings or a lamp holder. Follow the manufacturer's instructions carefully. This is usually straightforward – think IKEA for growers!
Step 3: Install the HPS Bulb (CRITICAL SAFETY STEP!)
This is where gloves are your best friend!
-
NEVER touch the HPS bulb glass with bare hands. Oils from your skin can create hot spots, reducing the bulb's lifespan and potentially causing it to shatter. Use clean gloves or a clean, dry cloth.
-
Carefully screw the 600W HPS bulb into the ceramic lamp holder within your reflector. It should be snug but don't overtighten.
-
Ensure the bulb is seated correctly and straight.
Step 4: Connect the Reflector to the Ballast
Your reflector will have a cord that connects to the digital ballast. This is usually a plug-and-play connection, often a Kettle Lead (IEC) connector. Ensure it's pushed in firmly.
Step 5: Hang Your Light Safely and Securely
This is vital for both safety and optimal light distribution.
-
Use sturdy hangers: Attach your rope ratchets or light hangers to the top bars of your grow tent or a secure point in your grow room.
-
Level is Key: Use the adjusters on your hangers to ensure the reflector is perfectly level. An uneven light distribution means some plants get more light than others, leading to uneven growth.
-
Secure Cables: Route the power cables neatly and securely, ensuring they won't get tangled or pulled down.
Step 6: Connect the Ballast to Power & Timer
-
Plug your digital ballast's power cord into your digital timer.
-
Then, plug the timer into a wall socket.
-
IMPORTANT: Ensure the timer is OFF or set to the OFF position during this initial setup. We don't want the light accidentally switching on yet!
Step 7: Final Check and Initial Power On
-
Double-check all connections. Is the bulb secure? Is the reflector level? Are all cables safely routed?
-
Confirm your grow room or tent environment is ready for light.
-
Now, you can turn your timer ON, or manually switch on the socket. Your light should now power up!
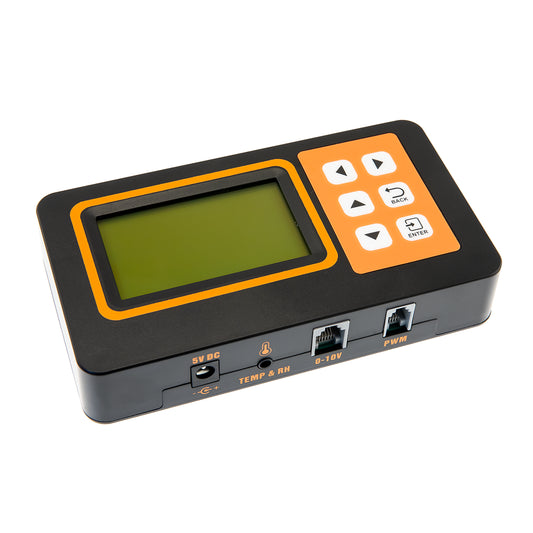
Understanding Your Dimmer Settings: 250W, 400W, 600W & Boost
One of the biggest advantages of a 600W digital HPS kit is its versatility. You can adjust the power output to suit different stages of plant growth and environmental conditions.
Most digital ballasts will have a rotary dial or push buttons to cycle through these settings:
-
250W Setting: Ideal for very young seedlings, clones, or for use in smaller grow spaces where 600W would be overkill. This helps prevent scorching and reduces heat output.
-
400W Setting: Great for vegetative growth or for transitioning plants, offering a good balance of intensity and heat management.
-
600W Setting: This is your standard full power for vigorous vegetative growth and the early to mid-flowering stages. This is where your 600W HPS grow light truly shines.
-
Boost/Super Lumen Setting (often 660W): This pushes your bulb slightly past its rated wattage for an extra burst of intensity. It's best reserved for the peak of the flowering cycle (mid to late flower) when plants can utilise the extra light most effectively. Use sparingly, as it can slightly reduce bulb lifespan and increase heat.
To adjust: Simply turn the dial or press the button on your digital ballast to select the desired wattage. The ballast will automatically adjust its output.
Optimal Coverage & Distance from Plants:
A 600W HPS grow light is typically designed to cover a specific area effectively, often referred to as its footprint.
-
Coverage Area: For optimal intensity, a 600W HPS is best suited for a 1.0m x 1.0m (approx. 3.3ft x 3.3ft) to 1.2m x 1.2m (approx. 4ft x 4ft) square metre grow space. Pushing it too wide will result in lower light intensity at the edges.
-
Distance from Plants: This is crucial to prevent light burn (too close) or stretching (too far).
-
Seedlings/Clones (250W/400W): Start around 60-90cm (24-36 inches) above the canopy.
-
Vegetative Growth (400W/600W): Aim for 45-60cm (18-24 inches) above the canopy.
-
Flowering (600W/Boost): You can often bring it down to 30-45cm (12-18 inches) above the canopy, depending on your plant's strain and the reflector type.
-
Always monitor your plants! Look for signs of stress: curling leaves, yellowing at the top, or bleaching can indicate the light is too close. Stretching with long internodes suggests it's too far. Use your rope ratchets to adjust as your plants grow.
Final Thoughts on Your HPS Setup
Setting up your 600W Digital HPS kit is a rewarding step towards a thriving indoor garden. By following these steps for safe installation, understanding your dimming options, and maintaining optimal distances, you'll be well on your way to impressive yields.
Remember, consistency and observation are key. Happy growing, UK growers!